Switch up your shooting mode for capturing your best shots with this
Basic Masterclass
Learning the basic setting in photography
Photography is all about the light
three main settings of manual photography
The ISO
The ISO is literally the setting of sensibilisation of the sensor of the camera.
Aperture
Aperture, as the word says, is the how much the lens is open.
Shutter speed
Aperture and shutter speed are linked because is the time you set and decide for how much time the lens will stay opened.
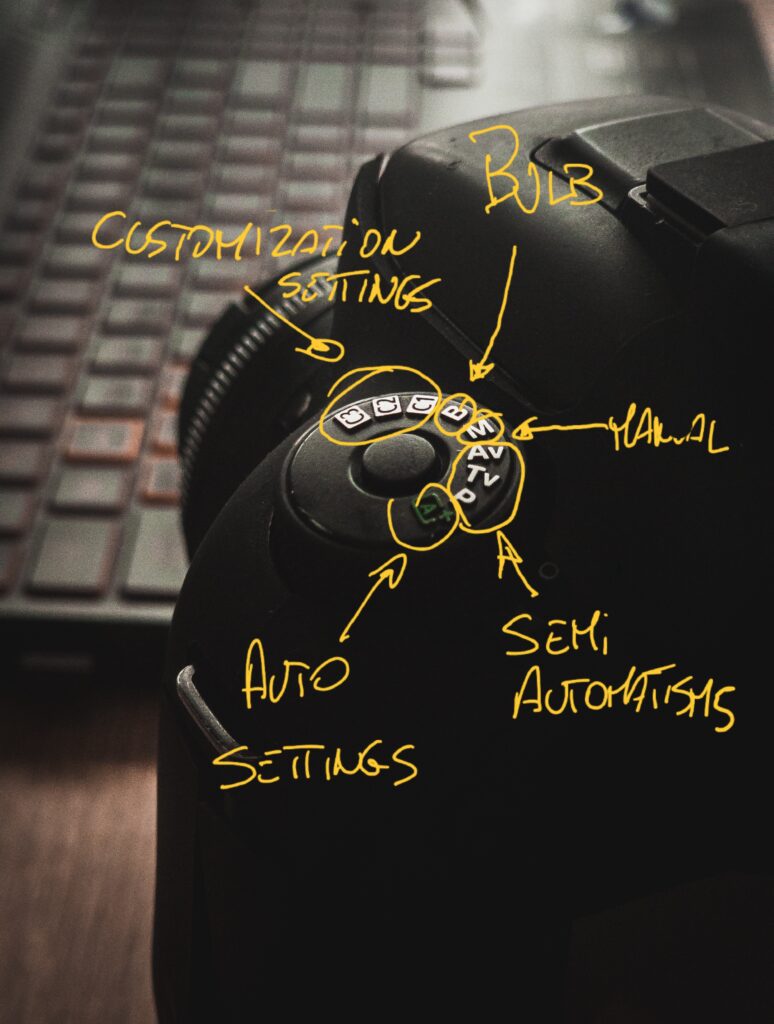
Start from here
Set your camera as you prefer.
All the cameras have a bezel on the side. For sure they have Auto setting mode (A) and Manual settings (M).
There are other settings you can find over:
- Bulb (B): This mode is setting when you want to keep the sutter speed open as much as you want as you keep the button pressed. This mode is used, for example, for taking pictures of star trailing.
- Manual: Allows to set manually shutter speed, aperture and ISO.
- Av – Aperture priority: This one of semiautomatisms that allows you to set the aperture while the camera will set automatically ISO and the sutter speed.
- Tv – Shutter priority: As the Av mode, here you can set the shutter speed while the camera will decide the best set for ISO and aperture.
- P – Program AE: Another semiautomatisms that allows you to set the exposure of your camera (the ISO).
- C1-C2-C3: customization setting. you can set some of your customisation using the menu of you camera.
Just to know
Manual setting is the best way to understand how your camera works.
One of the advice for anyone who want to start to take pictures is taking them manually because you can experiment and try every setting that you camera offer to you from the basic one to the professional ones. The best way is “playing” with the settings and watch thousands of tutorials online.
Iso
Is that usefull?
Why is the most hated setting? For sure for the electronic noise but it is also very usefull if we want to take pictures in certain conditions when the light is too low or…to much.
What ISO means? It means International Organisation of Standardization used in many sector, not only photography, but, in this case we can simply say that ISO is the sensitivity of our camera sensor.
Usually, the value of ISO starts from 100 till 6400 for the entry level cameras (now smarthphones, as well) or more for professional camera or cinema ones.
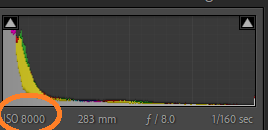
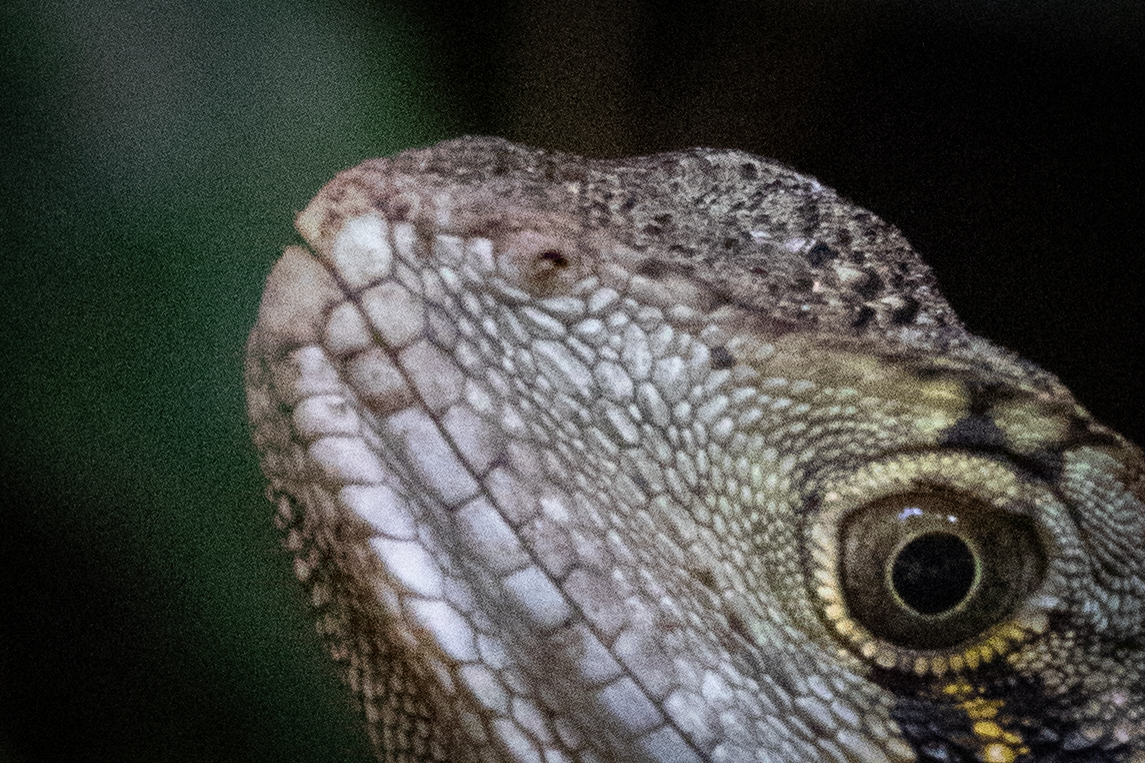
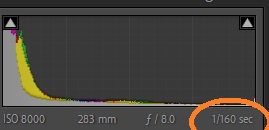
What does that values mean? Basically, more the value is high more your sensor will be sensible to the light and than more light in your pictures, viceversa if the value is low the sensor will be less sensible. Most of photographer suggest do not go more than 6400 or 8000 ISO because of the electronic noise, infact, more the ISO is high more noise we have in our pictures. As showed in the picture on the side 👉 this picture was taken with ISO 8000 because of the scarsity of light but as result we obtained to much noise. We can repair this “mistake” in postproduction but remember that softwares can’t make miracles, just a stopgap measure sometimes with very good results.


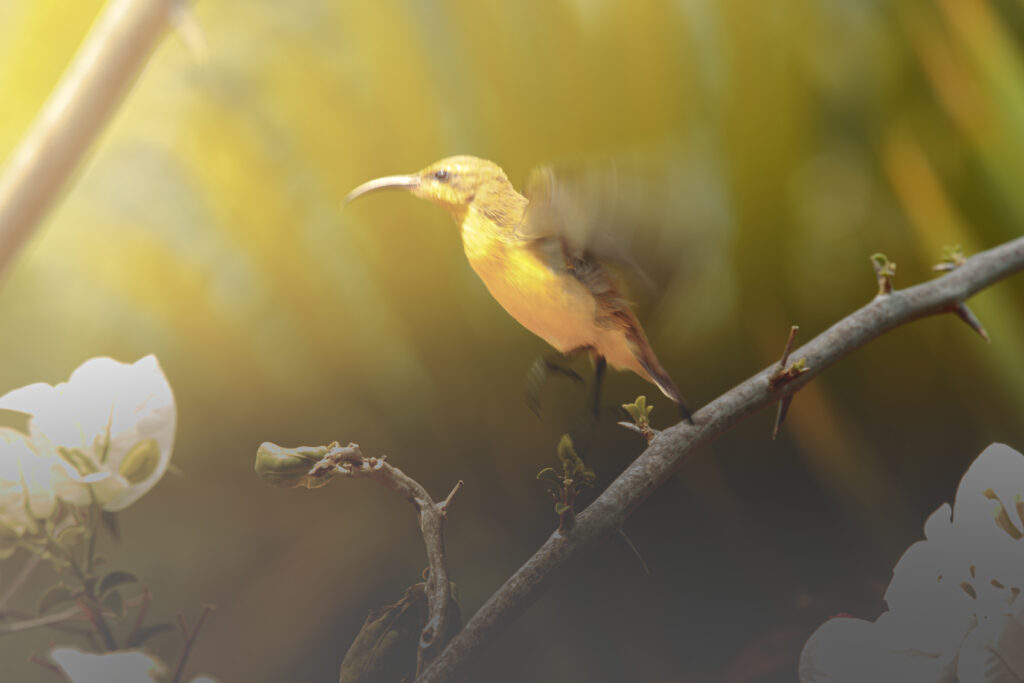
As you can see in the slide👇, the same picture shows a focus background and an unfocused one that one is the depth of field. Choosing what is the best is not simple to say because all depends on what kind of picture you want to take. For example, most of portrait photographer, used a high aperture ( f/5.6 to 8.0), naturalist photographer range is between f/8.0 to f/11, nightsky photographer used very high aperture (f/1.2 or f/1.8), landscape photographer used very low aperture (f/11 to f/15) because they want to take most of details of the landscapes.
However, a wrong aperture can “burn” your photo, taking to much light and very hard to correct it in editing session like shown in the snake picture ☝️.
Aperture
The lenses setting.
This setting it’s one of the most important you should understand for taking picture and do not waste time and storage of thousand of picture with bad aperture. Aperture plays an important rule in natural photography.
You can see the value of the aperture preceded with F letter.
Compared to ISO above, here the high value of aperture means that you have less light taken inside the lens an than the sensor.
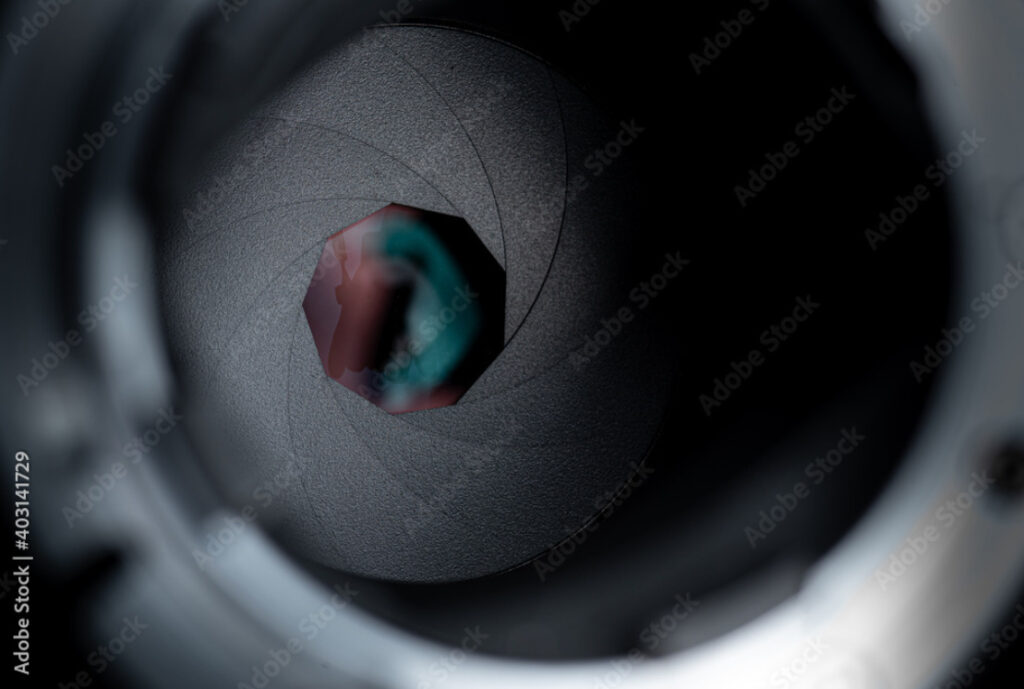
The aperture is a mechanical movement wich open or close the lens with small pieces of blade as shown 👇. We can also compare the aperture of the lens to the eyes. Our pupil opens and closes itself depending of the light of the environment.
Another specific of the aperture is depth of field, which is how much focus you have in you picture.

Shutter speed
The time is everything
Some of most beautiful natural pictures in the world was taken because:
- The photographer was in the right place
- The photographer was in that place in the right moment
- The photographer was able to set the camera and take the exact moment he/she wanted to take.
Ok, but what is the shutter speed?
In simple words, the shutter speed is the time you chose for telling to the lens how long it needs to stay open.
This feature is mostly used and played, for example, for creating the silky smooth water effect or for the nigh sky photography.
In general, the shutter speed is essential if you want to beat the time.
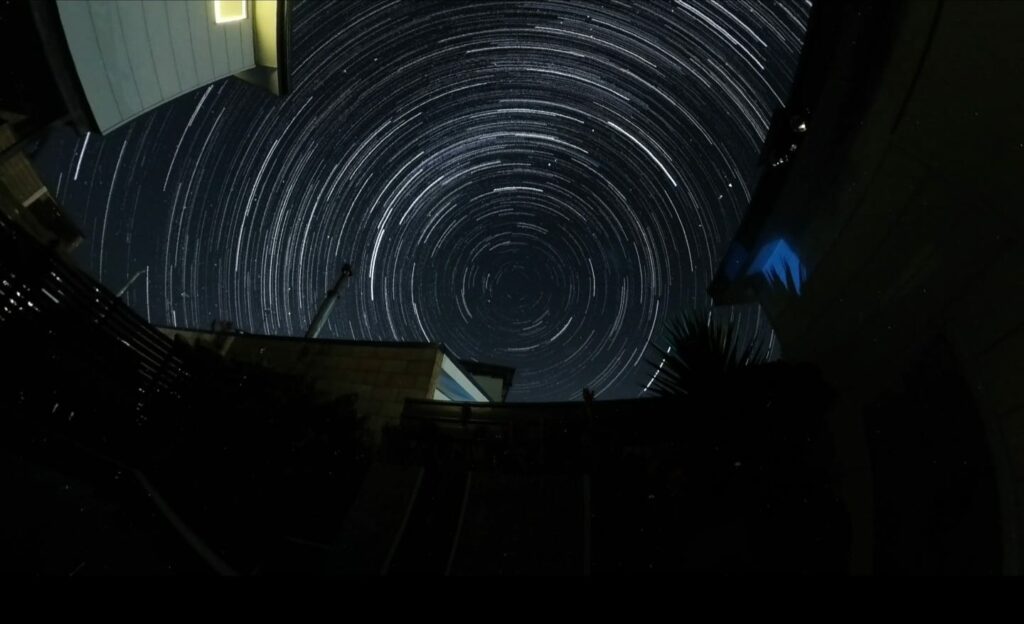
Fun fact: do you know that the Earth spinning around itself and you can see it?
Do you rembember the Bulb setting? Well that setting allow us to set our shutter speed as long as you push your shutter button. Basically, if you click on your button, the lens stays open as long as you want.
The result is a picture as shown on the side. What you see, it is what, in photography, is called star trail.
That means that I need to stay for long time with the button pressed? Obviosly not. There are, in commerce, lots of remote controller where you can set the same in BULB and then the camera stays open without you do nothing.
and what about the smartphone?
Nowaday, all the smartphone has taken "PRO" camera setting (or the yhave different name depending of the brand). Anyway, from that you can set you camera manually and taking you own picture as your creativity tells.
The same rules of camera should be applicate in smartphones camera setting.
A debatite between PRO CAMERAS and PRO SMARTSPHONE:
Most argues that you can take beautiful pictures from a smartphone but, in my opinion, a camera is still a camera. Most of brands play the rules of "more megapixel you have, best pictures you can take". That's not totally true.
The megapixel of a picture is the number of pixel in an entire pictures you took but it doesn't mean that the picture is better than one with 24 or 32.
This feature could be the best if your intentions are to print a photo or cropping it in postproduction.
In most of smartphone you can set ISO and the shutterspeed but not the aperture because the small design of the camera doesn't allow the engineers to have mechanical system inside of it so they fix a standard aperture for each camera, otherwise, the prices of smartphone could be more expensive than usual.
If you are an enthusiast photographer, you don't need to spend so much money for a Pro or Ultra version of the brand because there are many middle cost smartphones who take beautiful picture. Otherwise, if you are a photographer who need calculation power, the high-end smartphones could be the right choise.
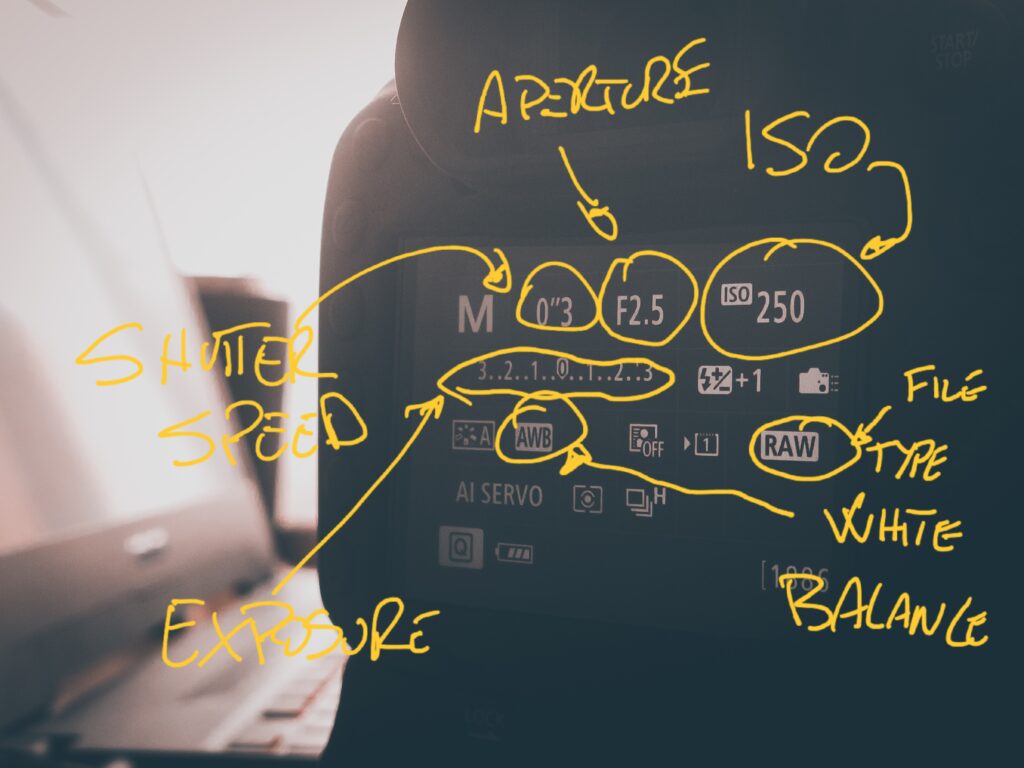
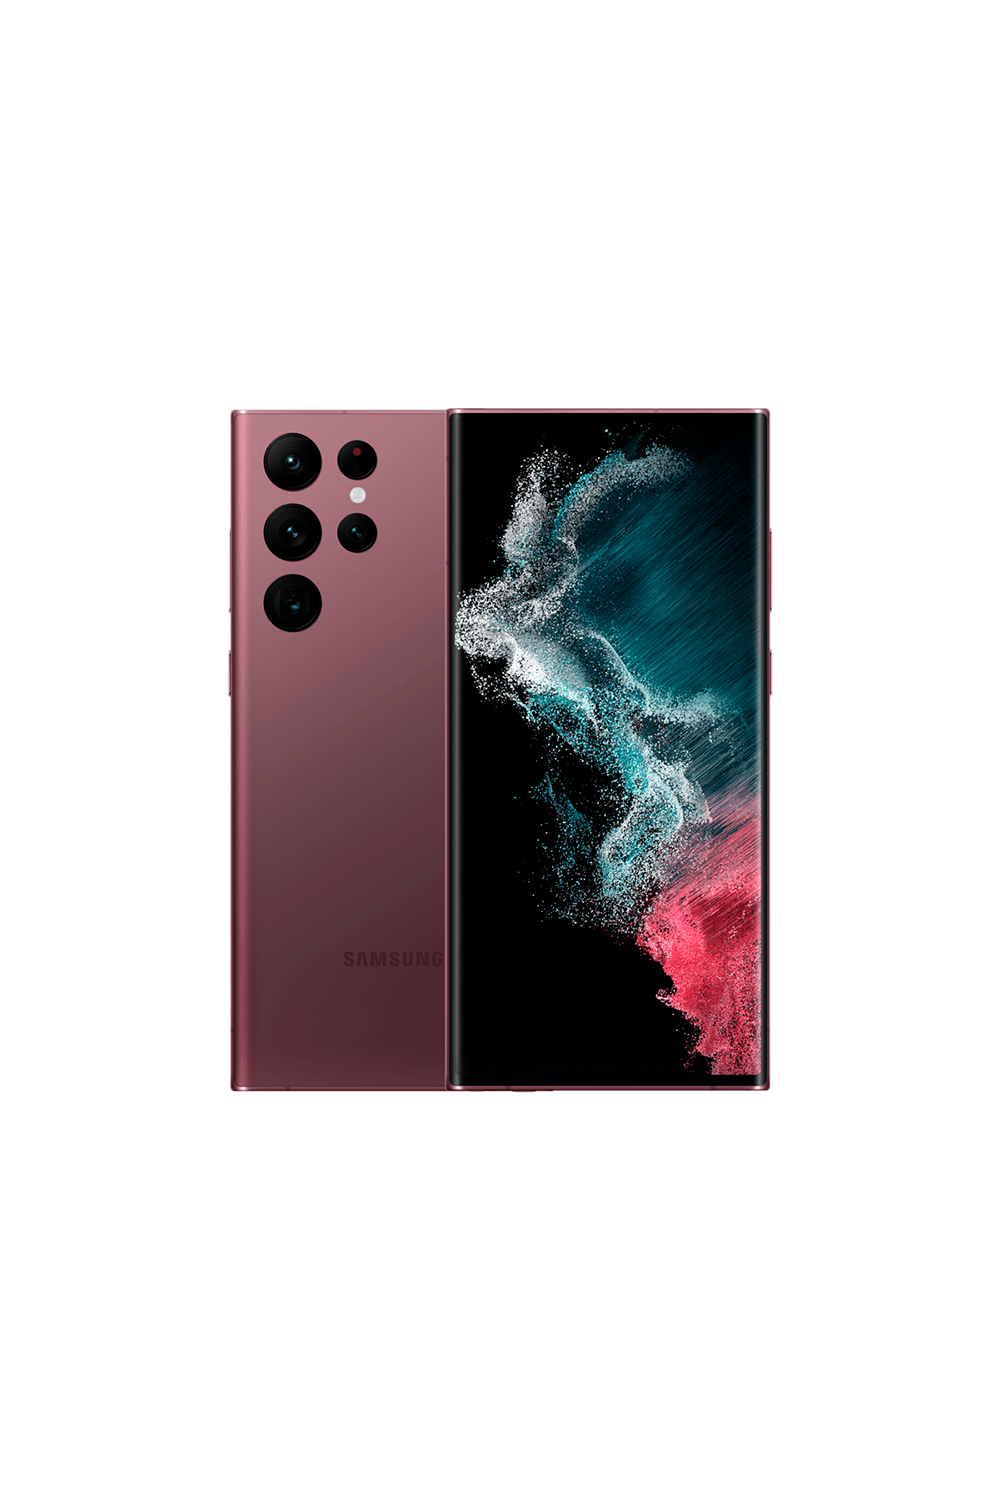
For example, the S2* Ultra line is very comfortable because of the presence of the SPen and the high fidelity of the processor. It helps a lot, for example. when PC isn't available and for quick post productions and sharings.


An example of screen setting on an Samsung S22 Ultra. You can set ISO, shutter
speed, the focus and the White Balance.
Editing
wHAT HAPPENS NEXT?
Why post production is crucial?
Post-production, or editing, is where the magic happens. It’s the process that turns your raw photos and videos into polished, professional-looking pieces of art. Here’s why it’s so important:
- Enhancing Quality: Editing allows you to improve the quality of your photos and videos by adjusting colors, brightness, contrast, and sharpness.
- Creating a Mood: Through color grading and other effects, you can create a specific mood or atmosphere that aligns with your creative vision.
- Correcting Mistakes: Even the best photographers and videographers make mistakes. Editing helps you fix issues like exposure problems, color imbalances, or unwanted objects in the frame.
- Telling a Story: In video editing, you can arrange clips, add transitions, and incorporate music or voiceovers to craft a compelling narrative.
Essential programs
Getting started with editing can be overwhelming, but knowing which programs to use makes a big difference. Here are the top programs for beginners
Photo editing
- Adobe Lightroom: Ideal for beginners, Lightroom offers a user-friendly interface and powerful tools for adjusting exposure, color, and composition. It’s perfect for organizing and editing large batches of photos.
- Adobe Photoshop: While more advanced, Photoshop is a versatile tool for detailed photo editing and manipulation. It’s great for tasks that require precision, like retouching and creating composites.
There are also Adobe app for smartphone like Lightroom Classic and Photoshop express. They have been made for quick editing from Android/iOS devices.
Video Editing
- Adobe Premiere Pro: A professional-grade video editing software that’s widely used in the industry. It’s powerful and flexible, suitable for everything from simple cuts to complex projects.
- Final Cut Pro: Available for Mac users, Final Cut Pro offers a seamless editing experience with a range of advanced features. It’s known for its efficiency and user-friendly design.
- DaVinci Resolve: Known for its robust color grading capabilities, DaVinci Resolve also offers a full suite of editing tools. It’s available in a free version, making it accessible to beginners.
Getting started
- Learn the Basics: Start with the basic tools and functions of your chosen software. Familiarize yourself with the workspace and experiment with simple edits.
- Practice Regularly: The more you practice, the more comfortable you’ll become. Try editing different types of photos and videos to build your skills.
- Watch Tutorials: There are countless free tutorials online that can help you learn new techniques and improve your editing skills.
- Join Communities: Online communities and forums can be great places to ask questions, share your work, and get feedback from others.
Editing is an essential skill in the world of photography and videography. By understanding its importance and learning how to use the right tools, you can elevate your work to new heights.